Follow me! Click the logo on the left of this page! Happy Pinning!
Showing posts with label crafts. Show all posts

Tuesday, July 21, 2015

4th of July Door Hanger Wreath


First of all please don't kill me! I know it's been over a year! This is an easy wreath for 4th of July, Memorial Day, Veterans Day or any day.

Inspiration found HERE

What you need is:
Wreath Form:
Yarn of your choosing:
Foam Stars (Got in Craft Dept at Wal-Mart)
Hot Glue
Scissors

PROCEDURE:
Begin wrapping yarn around wreath form. I tied mine in a knot on the first loop.
Continue until you have the desired width of color.
To switch colors easily, just cut and tie to the next color:
Continue until you have completed the wreath. Hot glue the stars onto the wreath form in any order you want.

Viola!

Thanks for visiting and please subscribe!

Saturday, September 14, 2013

Zebra Duct Tape Decor

I love duct tape, especially cute duct tape. I embellished several things for my office. The first I just taped around the clock. Second picture is PVC Pipe with a Drain PVC thingy that it fit on (Home Depot) I will use it for a plant that I have. You can also use it for umbrellas or whatever.
Let your imagination go wild!

PVC pipe!


I cut the PVC pipe down for my spray!


Easter Table Decor

Materials Needed:
Peeps
Dowel Rod
Bucket ($1 Tree)
Ribbon ($1 Tree)
Grass ($1 Tree)
Tape
Wooden wreath ($1 Tree)
Styrofoam (I used the green plant stuff)

Procedure:
Glue the Peeps around the wreath.
Glue the wreath to the dowel rod.
Take tape and tape a waffle like pattern on the bucket so that the stick will stay after it's stuck down in the styrofoam.
Place grass ontop.
Decorate the bucket with the ribbon.


Friday, November 23, 2012

"Tom's" Knock Offs

Materials Needed:
Fabric shoes...I got mine at Wal-mart for $9
Glitter Glue (opt) got mine at $ Tree
Paint Pens

Procedure:
Since I had red shoes I got red glitter glue. I smeared the glue all over the tip section of the shoe and along the back section as well as the trip around the top part of the shoe.
Then I went a little overboard crazy, lol, I made these while watching Once Upon A Time ;)
Let dry.....viola!
I will probably do some other ones with only glitter next time!


Sunday, October 14, 2012

Toilet Paper Roll Wall Art


You can see all over Pinterest some really cool things to do with toilet paper. I have a board dedicated to it! See that HERE.

Here are some of my creations:
Inspiration for this one HERE

  Inspiration for this one HERE


Inspiration for this one HERE


 Inspiration for this one HERE


Made these two as gifts

"BerFlops" Flip Flop Designs

My "BerFlops" Creations:

Materials: I used all from Hobby Lobby (fun fur, balloons, weave loops and bling) These are just a couple of the different designs I have done...all of these were sold for a charity auction for breast cancer at my workplace :)


Saturday, October 13, 2012

Halloween Door Hanging


I got my inspiration with this pin: HERE

Materials needed:
3 foam plant wreath rings (got at $1 Tree)
Hot glue
Halloween tissue paper
Ribbon
Cricut Expression 2
Jubilee and Wild Card Cartridges
Duct Tape

Procedure:
I did one ring at a time.
Wrapped with tissue paper, secured with duct tape (I used black) Then around the outer edge completely went around the ring with the duct tape for a smoother look.
Hot glued each ring together.
Cut out letters with Jubilee cartridge.
Used Wild card for the spiderweb.
Put letters on the rings.
Added ribbon to the back of the outer rings with duct tape and hot glue.
For an optional touch, I cut out circles the size of the rings to add to the back of each one to cover up the duct tape mess.

Here is one my friend asked me to make for her:


Duct Tape Fan Decor


I took really cute duct tape and completely covered my little battery operated fan for work. I think it looks adorable...can do this with many different things!

You can find even more ideas on the wonderful site of Pinterest!

Sunday, December 11, 2011

Ruffled Tree Skirt!


Pinterest...it is your fault! You are the reason my back is killing me. You are the reason my butt is numb! You are the reason I have the most BEAUTIFUL tree skirt I have ever seen! And you know what?? 5-6 hours of burning my finger with my hot glue gun and it was completely worth it!
I had a little help at first from my husband.....but he isn't the most patient person for crafts :) I did have help from my kitty, River :)
River wanted to help :)
Finished...whoo hooo! Now let's put it around the tree!
Looks sooo good!
Materials:
3 yards of regular cotton material what ever color. I went with a baby yellow even though it looks darker in the picture?! - $8
Hot Glue Gun (I used a big one, not the mini one)
Painter's Tarp - $4 - for the bottom part of the skirt - I have seen some where people used their existing tree skirt to glue the material on....that could work too!
Rotary Cutter or Scissors
How To:
What I did was take my existing tree skirt and folded it in half to cut the template out of my painter's tarp:
Next I folded my fabric and cut the sides off....where the folds are so I can make even strips.
Now the tricky part. At the beginning my hubs was helping. He actually made a makeshift protractor so that I could have lines where to glue my material to.....didn't work out as planned! The lines were off every single time which led to why my husband wasn't helping me, lol.  So I scrapped that idea and just went freestyle.
What I did was just glue it where ever I wanted. 
Starting at the bottom, I tried all kinds of ways to glue the material, which you can find whatever is easiest for you. I don't have pictures of how I did it because I kind of had both of my hands occupied :)  I glued a semi-long swirly line where I wanted the fabric to go and I laid it completely flat on the glue then pulled it up really quick and folded the fabric however big I wanted the ruffle to be. That worked out big time! I was able to go almost completely around the diameter of the template with just one long (3 yards) piece of fabric. It took about 1 1/4 pieces to go around once...on the bottom half.
Continue around and around and around. I also timed myself to see how long it took me to go around the skirt.....26 minutes! As you move up it will go quicker because the circle gets smaller. :)
At the end I cut four long strips and glued them to the inside part where the slit is so I could tie it in the back. I didn't really need that though.....It worked out great without tying it!!! So worth the back pain :)  Happy Pinning!

As always, you can find this idea and possibly videos of the process on the wonderful Pinterest!

Saturday, December 10, 2011

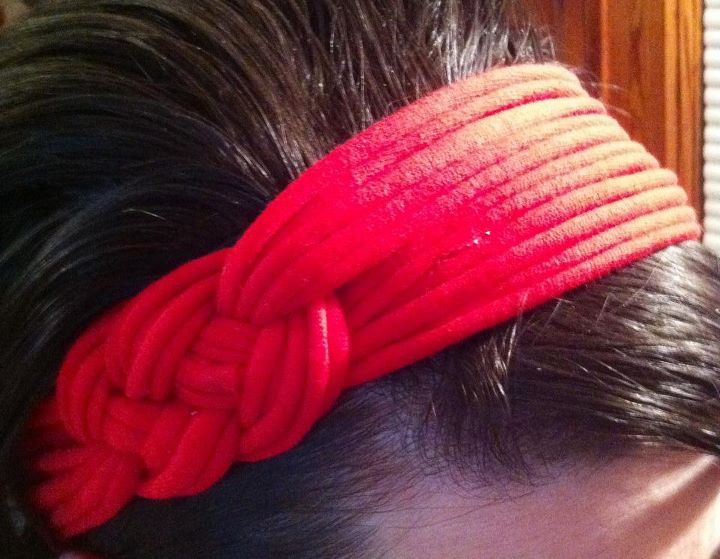
T-Shirt Head Band!


What?? T-Shirt head band?? Are you serious, Pinterest?
Materials:
T-Shirt (I used the remaining from my braided scarf....one of the sleeves!)
Hot Glue

How To:
Cut your sleeves horizontally all the way up to separate each one.
Stretch Stretch Stretch them out
Tie your knot/braid. This is a great tutorial on You Seriously Made That? that I followed but they used yarn.
Once braided/knotted, figure out the size you need it on your head and either glue together or glue pieces of t-shirt to each end and tie it! That's what I did. 

This head band looks good, but I can't make it look good on me, lol

You can find videos and other ideas on how to do these on Pinterest!! Come and follow me by clicking the Pinterest logo on the left hand side of this page!

T-Shirt Ring?! Yes thank you!

Pinterest....never leave!!
Materials:
One little felt circle.
Little circles cut out of t-shirt scraps
Hot Glue
Toothpick, optional

How To:
Put one t-shirt circle on top of toothpick and bend around it.
Take hot glue gun and put a dab of glue on the point
Flip the circle over onto the felt...keeping it on the toothpick (to prevent burning your finger!) and press down
Continue until you can't fit anymore on the felt circle.
Take a scrap, I prefer the seam/hem of the t-shirt and wrap it around your finger to get the size you need.
Hot glue it into the ring.
Take your felt and hot glue the bottom of it and stick it on the ring.
Optional:
Trim the excess parts of the t-shirt circles to make it the volume that you would like!

I think these in school colors for cheerleaders would be ADORABLE!

Here is one I made for a friend for her favorite team the Saints:


You can find videos on how to do these on Pinterest!! Come and follow me by clicking the Pinterest logo on the left hand side of this page!

Ornament Wreath!!!

Once again another beautiful Pinterest craft....just in time for the holidays!


Materials:
Gold and silver ornaments from $1 Tree. 
Half of a foam pipe insulator duct taped together. (another Pinterest idea!)
One 20 gage floral wire on the top around to make a loop to hang it with.
Hot Glue

How To:
Go crazy gluing the ornaments anywhere you want!

I also used plastic Easter eggs for this exact wreath:


You can find videos on how to do these on Pinterest!! Come and follow me by clicking the Pinterest logo on the left hand side of this page!


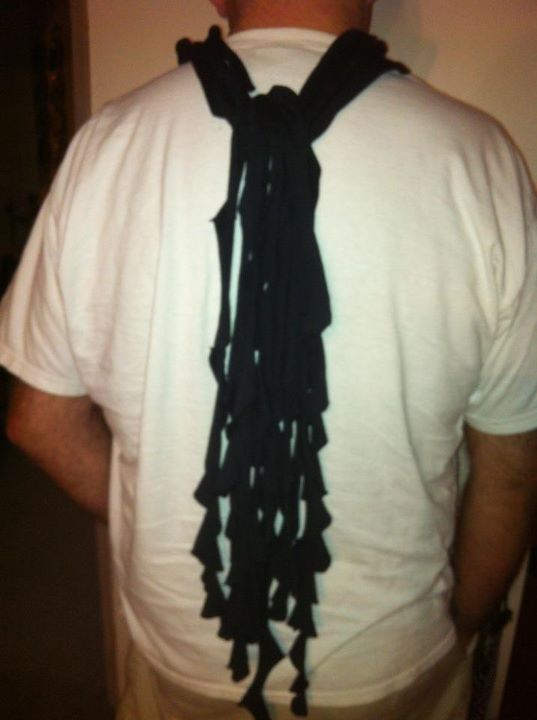
T-Shirt Scarf!!!!!


I love t-shirt crafts!!!! They are awesome! I decided I wanted to try the curled t-shirt craft that I saw on Pinterest (the best site in the world!) I looked everywhere in my closet (and my husband's too) and couldn't find one that I wanted to use. So off to Wal-mart I go. I got 2 4xl shirts out of men's wear one red and one black. Ran (drove) to my house and procrastinated. LOL Once I got started though there was noooo turning back!!

Materials:
4xl black mens t-shirt
paper plate
Fabri-tac glue
Rotary Cutter (I can't believe I have lived this long without one of these doodads!!)
Cutting board (The rotarty cutter is so sharp it will slice through all kinds of stuff)

How To:
Lay the shirt flat on the cutting board.
Put the paper plate on the shirt.
Take rotary cutter (or scissors) and cut around the plate.
Cut as many circles around the shirt you can.
Once done, cut spirals around the circles.
Stretch the spiral cuts out and rub your hands up and down them to stretch.
Continue with all.
Take two and glue the tips together to make one long string per 2 circles.
When done, gather together and take a scrap piece of shirt and tie around to keep them together, then to make it presentable, another square scrap and glue it around the knot "hiding" it.

You can find videos on how to do these on Pinterest!! Come and follow me by clicking the Pinterest logo on the left hand side of this page!

Peace!
Amber