Follow me! Click the logo on the left of this page! Happy Pinning!

Sunday, December 11, 2011

Ruffled Tree Skirt!


Pinterest...it is your fault! You are the reason my back is killing me. You are the reason my butt is numb! You are the reason I have the most BEAUTIFUL tree skirt I have ever seen! And you know what?? 5-6 hours of burning my finger with my hot glue gun and it was completely worth it!
I had a little help at first from my husband.....but he isn't the most patient person for crafts :) I did have help from my kitty, River :)
River wanted to help :)
Finished...whoo hooo! Now let's put it around the tree!
Looks sooo good!
Materials:
3 yards of regular cotton material what ever color. I went with a baby yellow even though it looks darker in the picture?! - $8
Hot Glue Gun (I used a big one, not the mini one)
Painter's Tarp - $4 - for the bottom part of the skirt - I have seen some where people used their existing tree skirt to glue the material on....that could work too!
Rotary Cutter or Scissors
How To:
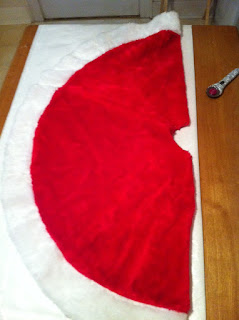
What I did was take my existing tree skirt and folded it in half to cut the template out of my painter's tarp:
Next I folded my fabric and cut the sides off....where the folds are so I can make even strips.
Now the tricky part. At the beginning my hubs was helping. He actually made a makeshift protractor so that I could have lines where to glue my material to.....didn't work out as planned! The lines were off every single time which led to why my husband wasn't helping me, lol.  So I scrapped that idea and just went freestyle.
What I did was just glue it where ever I wanted. 
Starting at the bottom, I tried all kinds of ways to glue the material, which you can find whatever is easiest for you. I don't have pictures of how I did it because I kind of had both of my hands occupied :)  I glued a semi-long swirly line where I wanted the fabric to go and I laid it completely flat on the glue then pulled it up really quick and folded the fabric however big I wanted the ruffle to be. That worked out big time! I was able to go almost completely around the diameter of the template with just one long (3 yards) piece of fabric. It took about 1 1/4 pieces to go around once...on the bottom half.
Continue around and around and around. I also timed myself to see how long it took me to go around the skirt.....26 minutes! As you move up it will go quicker because the circle gets smaller. :)
At the end I cut four long strips and glued them to the inside part where the slit is so I could tie it in the back. I didn't really need that though.....It worked out great without tying it!!! So worth the back pain :)  Happy Pinning!

As always, you can find this idea and possibly videos of the process on the wonderful Pinterest!

Saturday, December 10, 2011

Christmas Card of the Family!


Pinterest you have done it again! I just can't believe it! Inspiration, inspiration, inspiration!
Materials:
About 4 yards of lime green felt (for a makeshift green screen)
Santa hats
Three handsome dudes and one adorable kitty!
One poster board
Paint program (I have Paint Shop Pro X)
Digital Camera (I have a Nikon D3000 10.2MP DSLR)
Tripod
Sweetly_Broken Font (free on Pinterest!!)

How To:
After I took the pictures, I found a really pretty Christmas Wallpaper to use for the background. I also colored my fingernails with the computer program, lol :) Then just add the pictures of everyone else into the poster board area. I had to remove the fingers of all of us onto a layer of their own, that way it was much easier! Took me about 3 hours...but I think it was worth it :)


You can find videos and other ideas on how to do these on Pinterest!! Come and follow me by clicking the Pinterest logo on the left hand side of this page!


Camera Settings for a beautiful shot of your Christmas tree!


Oh Pinterest how do I love the.....sigh
Materials:
Digital Camera (I used my Nikon)
Flash turned off!
Cute kid
Christmas tree...or lights or whatever

How To:
I can not tell you how to do this! lol I strictly followed this tutorial over at Unskinny Bobby that of course where do you think I found this? Pinterest!
I had to adjust adjust adjust until I got the output that I desired because she uses a Canon. :)


You can find videos and other ideas on how to do these on Pinterest!! Come and follow me by clicking the Pinterest logo on the left hand side of this page!

T-Shirt Head Band!


What?? T-Shirt head band?? Are you serious, Pinterest?
Materials:
T-Shirt (I used the remaining from my braided scarf....one of the sleeves!)
Hot Glue

How To:
Cut your sleeves horizontally all the way up to separate each one.
Stretch Stretch Stretch them out
Tie your knot/braid. This is a great tutorial on You Seriously Made That? that I followed but they used yarn.
Once braided/knotted, figure out the size you need it on your head and either glue together or glue pieces of t-shirt to each end and tie it! That's what I did. 

This head band looks good, but I can't make it look good on me, lol

You can find videos and other ideas on how to do these on Pinterest!! Come and follow me by clicking the Pinterest logo on the left hand side of this page!

Christmas Count Down!!!

Pinterest.....why must you make me stay up all hours of the night doing crafts??? That's ok I forgive you ;)
Materials:
A Sharpie, black
Chalkboard spray paint (Krylon)
Stickers or pictures (I cut out pictures from cards and magazines)
A blank board (I got mine in the craft department in Wal-Mart)
Red Wirey Ribbon, optional
Any color paint, optional (I had my 8 year old paint the board before I worked on it with white acrylic paint)
Modge Podge (Pinterest has a recipe for homemade Modge Podge...haven't tried it yet)

How To:
Paint board chosen color for background (also serves as a primer for your spray paint)
Let dry
Cover the board completely except for a little square where ever you would like the countdown numbers to go.
Go outside and put the board in a big box and chalk board spray paint the squared (or whatever shape you prefer) section.
Let dry overnight.
Spray another layer. Let dry overnight.
Remove the covering.
Add your embellishments with modge podge and also over the top.
For the font...I just picked some I liked and typed up the words I wanted and just looked at them on my computer and wrote them myself on the board. You can use your Cricut (wish I had one!) or scrap-booking stickers, what ever you want, remember this is your board!
You can either put on your wall or place on a plate holder, that's what I did!


You can find videos and other ideas on how to do these on Pinterest!! Come and follow me by clicking the Pinterest logo on the left hand side of this page!

T-Shirt Ring?! Yes thank you!

Pinterest....never leave!!
Materials:
One little felt circle.
Little circles cut out of t-shirt scraps
Hot Glue
Toothpick, optional

How To:
Put one t-shirt circle on top of toothpick and bend around it.
Take hot glue gun and put a dab of glue on the point
Flip the circle over onto the felt...keeping it on the toothpick (to prevent burning your finger!) and press down
Continue until you can't fit anymore on the felt circle.
Take a scrap, I prefer the seam/hem of the t-shirt and wrap it around your finger to get the size you need.
Hot glue it into the ring.
Take your felt and hot glue the bottom of it and stick it on the ring.
Optional:
Trim the excess parts of the t-shirt circles to make it the volume that you would like!

I think these in school colors for cheerleaders would be ADORABLE!

Here is one I made for a friend for her favorite team the Saints:


You can find videos on how to do these on Pinterest!! Come and follow me by clicking the Pinterest logo on the left hand side of this page!

Braided T-Shirt Scarf!!!

This scarf is absolutely beautiful!! PINTEREST!!! Seriously? You are wonderful!
Materials:
Red t shirt (I used men's 4xl)
Rotary Cutter or Scissors
Fabric Glue

How To:
Cut the shirt horizontally under the armpits straight across.
Starting with the side of the shirt cut HORIZONTAL strips all the way up to about 1/2 inch from the top.
When done...stretch stretch stretch to make the cuts look long and cute.
If you are gonna braid, which is purely optional, cut only one side of the shirt (front) loose from the 1/2 at the top.
I separated evenly and braided like I would long pigtails.
Tie off with a scrap strip.
You can leave them separated, my friend did and it turned out cute, or you could connect them by using a rectangle scrap and going around as you glue. 
Thank you to my 8 year old for modeling ;)


You can find videos on how to do these on Pinterest!! Come and follow me by clicking the Pinterest logo on the left hand side of this page!

Paper Flowers!!!


Don't know what I am gonna do with them...maybe a wreath, or picture frame enhancements, or door hanger enhancements? Pinterest...where have you been all my life?
Materials:
Construction paper or any kind of paper whatever color you want.
Scissors
Hot Glue (optional)

How To:
Cut out squares in different sizes.
Cut spirals into the squares making the square circle.
Roll up from the outside all the way to the inside.
Let go!
It will transform to the pictures above!
I glued the middle section on the bottom to use like a "stand"

My 8 year old son did the blue flowers above....yes they are that easy!! :)

You can find videos on how to do these on Pinterest!! Come and follow me by clicking the Pinterest logo on the left hand side of this page!

Update:
Made my mother a beautiful picture frame for Christmas! She loved it!

Ornament Wreath!!!

Once again another beautiful Pinterest craft....just in time for the holidays!


Materials:
Gold and silver ornaments from $1 Tree. 
Half of a foam pipe insulator duct taped together. (another Pinterest idea!)
One 20 gage floral wire on the top around to make a loop to hang it with.
Hot Glue

How To:
Go crazy gluing the ornaments anywhere you want!

I also used plastic Easter eggs for this exact wreath:


You can find videos on how to do these on Pinterest!! Come and follow me by clicking the Pinterest logo on the left hand side of this page!


T-Shirt Scarf!!!!!


I love t-shirt crafts!!!! They are awesome! I decided I wanted to try the curled t-shirt craft that I saw on Pinterest (the best site in the world!) I looked everywhere in my closet (and my husband's too) and couldn't find one that I wanted to use. So off to Wal-mart I go. I got 2 4xl shirts out of men's wear one red and one black. Ran (drove) to my house and procrastinated. LOL Once I got started though there was noooo turning back!!

Materials:
4xl black mens t-shirt
paper plate
Fabri-tac glue
Rotary Cutter (I can't believe I have lived this long without one of these doodads!!)
Cutting board (The rotarty cutter is so sharp it will slice through all kinds of stuff)

How To:
Lay the shirt flat on the cutting board.
Put the paper plate on the shirt.
Take rotary cutter (or scissors) and cut around the plate.
Cut as many circles around the shirt you can.
Once done, cut spirals around the circles.
Stretch the spiral cuts out and rub your hands up and down them to stretch.
Continue with all.
Take two and glue the tips together to make one long string per 2 circles.
When done, gather together and take a scrap piece of shirt and tie around to keep them together, then to make it presentable, another square scrap and glue it around the knot "hiding" it.

You can find videos on how to do these on Pinterest!! Come and follow me by clicking the Pinterest logo on the left hand side of this page!

Peace!
Amber