Pinterest...it is your fault! You are the reason my back is killing me. You are the reason my butt is numb! You are the reason I have the most BEAUTIFUL tree skirt I have ever seen! And you know what?? 5-6 hours of burning my finger with my hot glue gun and it was completely worth it!
I had a little help at first from my husband.....but he isn't the most patient person for crafts :) I did have help from my kitty, River :)
River wanted to help :)
Finished...whoo hooo! Now let's put it around the tree!
Looks sooo good!
Materials:
3 yards of regular cotton material what ever color. I went with a baby yellow even though it looks darker in the picture?! - $8
Hot Glue Gun (I used a big one, not the mini one)
Painter's Tarp - $4 - for the bottom part of the skirt - I have seen some where people used their existing tree skirt to glue the material on....that could work too!
Rotary Cutter or Scissors
How To:
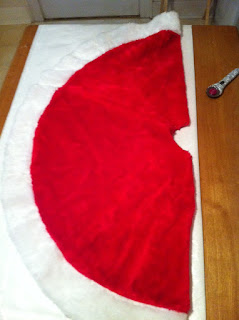
What I did was take my existing tree skirt and folded it in half to cut the template out of my painter's tarp:
Next I folded my fabric and cut the sides off....where the folds are so I can make even strips.
Now the tricky part. At the beginning my hubs was helping. He actually made a makeshift protractor so that I could have lines where to glue my material to.....didn't work out as planned! The lines were off every single time which led to why my husband wasn't helping me, lol. So I scrapped that idea and just went freestyle.
Now the tricky part. At the beginning my hubs was helping. He actually made a makeshift protractor so that I could have lines where to glue my material to.....didn't work out as planned! The lines were off every single time which led to why my husband wasn't helping me, lol. So I scrapped that idea and just went freestyle.
What I did was just glue it where ever I wanted.
Starting at the bottom, I tried all kinds of ways to glue the material, which you can find whatever is easiest for you. I don't have pictures of how I did it because I kind of had both of my hands occupied :) I glued a semi-long swirly line where I wanted the fabric to go and I laid it completely flat on the glue then pulled it up really quick and folded the fabric however big I wanted the ruffle to be. That worked out big time! I was able to go almost completely around the diameter of the template with just one long (3 yards) piece of fabric. It took about 1 1/4 pieces to go around once...on the bottom half.
Continue around and around and around. I also timed myself to see how long it took me to go around the skirt.....26 minutes! As you move up it will go quicker because the circle gets smaller. :)
At the end I cut four long strips and glued them to the inside part where the slit is so I could tie it in the back. I didn't really need that though.....It worked out great without tying it!!! So worth the back pain :) Happy Pinning!As always, you can find this idea and possibly videos of the process on the wonderful Pinterest!


It looks great, you did a very nice job. I think I will make one, but I will use the ruffler foot on my sewing machine and then sew the ruffles on. My back can't handle much of the 1/2 bent over position...lol!!! Again, it looks beautiful.
ReplyDeleteThanks Belinda! I thought about doing that exact thing, but I was already 3 rows into it, lol :)
ReplyDeleteOh how pretty! Great job, Amber.
ReplyDelete*bah* Belinda beat me to the comment I was gonna make (to suggest a ruffler foot or at least machine baste and pull the ruffles in before gluing)
I could have easily used my sewing machine, but I wanted to do the glue...all in one step :)
ReplyDelete